

Docs Menu
Project Modelling
Create a versioned project case, define its network connection, and compare generation, storage, and demand options.
Open Project Modelling
Watch the Video: Project Modelling: Getting Started (1:12)
- Open the Rosetta products menu.
- Select Project Modelling.
- Use the Project Scenario Modelling workbench inside Engineering Studies.
Project Modelling requires Professional or Enterprise access. Saved engineering cases belong to the active project or network context. A case is not the same as a map project. For shared engineering projects, your workspace role also controls access to saved data and changes.
Choose a modelling mode
| Mode | Use | Limits |
|---|---|---|
| Quick Estimate | Calculate one design from annual demand, generation, and financial assumptions. This is the default mode. | Option sweeps do not run in this mode. Network constraints are not evaluated, so the network result requires review. |
| Detailed Engineering Case | Use interval profiles, chronological dispatch, option sweeps, and network checks. | A credible network conclusion needs a suitable electrical model, point of connection, profiles, and assessed limits. Estimated data can require review. |
Follow the seven steps
| Step | Action | Guide |
|---|---|---|
| 1. Map Scope & Connection | Name the case, select its network and connection point, set limits, and capture the inputs. | This page. |
| 2. Demand & Resource Profiles | Enter baseline demand and attach interval files. | Profiles and Inputs |
| 3. DER Design | Add generation, batteries, and load changes. | DER Design |
| 4. Value & Finance | Set the financial assumptions and values. | Value and Finance and Tariffs |
| 5. Options | Choose a ranking metric and design sweeps. | Options and Results |
| 6. Validate & Run | Resolve readiness issues, screen designs, and validate finalists. | Options and Results |
| 7. Results | Review gates, metrics, intervals, map layers, and reports. | Options and Results |
Step 1: Map Scope & Connection
Identify the case
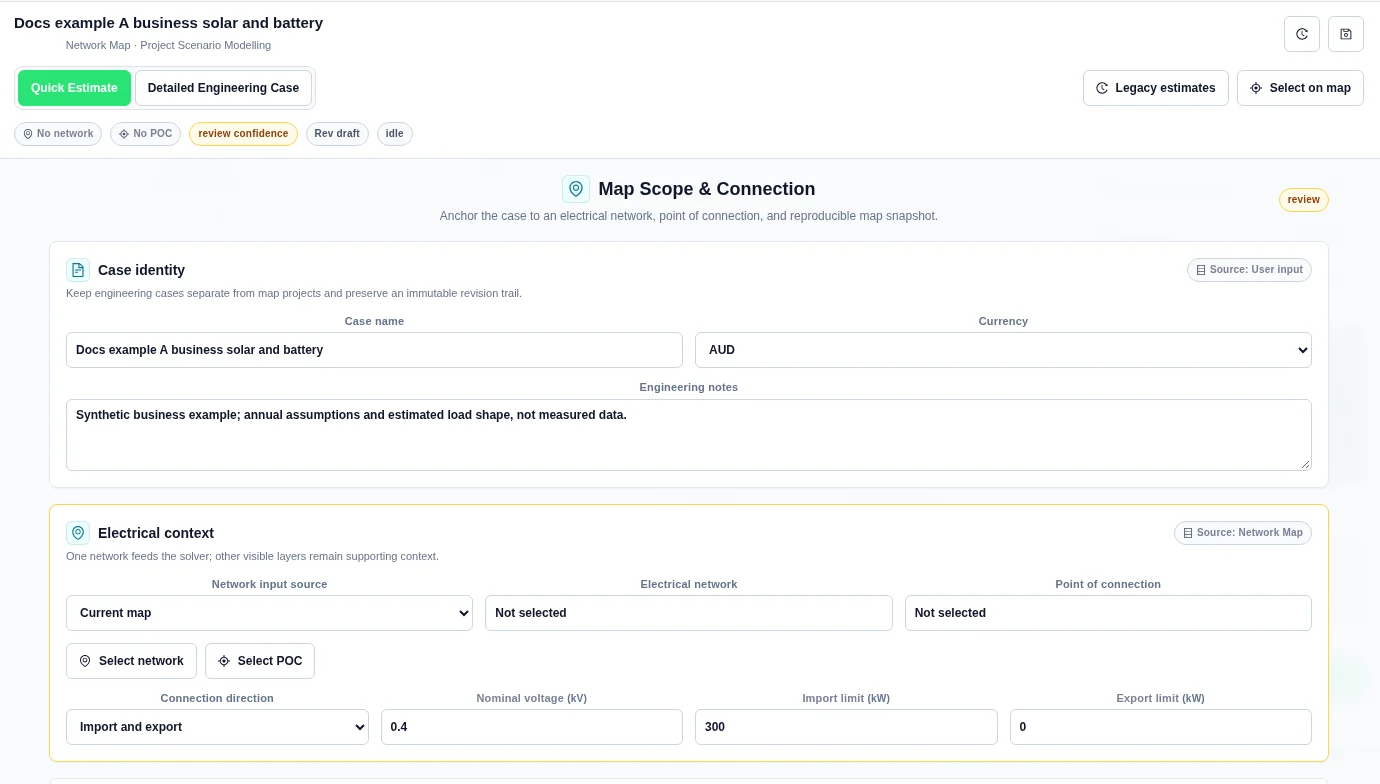
- Enter a Case name.
- Select Currency: AUD, USD, NZD, EUR, or GBP.
- Enter the purpose, assumptions, and source references in Engineering notes.
A new case starts as Untitled feasibility case in AUD. Currency selection does not convert your input values. Use one consistent currency throughout the case.
Select the electrical network and point of connection
- Set Network input source to Current map.
- Select Select network and choose the electrical network on the map.
- Select Select POC and choose the point of connection.
- Use Done selecting or Return to workbench to leave map selection.
- Check Electrical network and Point of connection in the workbench.
The header button Select on map also starts point-of-connection selection. One electrical network feeds the calculation. Other visible layers remain context. All assets in the case connect at the selected point of connection.
When Grid Circuit Builder inputs are available, select a published revision under Network input source. Choose Point of connection bus from that revision. Select Use selected circuit revision after the model loads. This uses the published circuit revision instead of the current map model. If capture requests a published revision, publish the intended revision in Grid Circuit Builder first.
Set the connection limits
| Field | Meaning |
|---|---|
| Connection direction | Choose Import and export, Import only, or Export only. The default is Import and export. |
| Nominal voltage (kV) | The voltage at the connection point. Confirm it against the source network information. |
| Import limit (kW) | The maximum grid import allowed for the case. Enter a confirmed limit. |
| Export limit (kW) | The maximum grid export allowed for the case. Enter a confirmed limit. |
Set Network screening criteria
| Field | Default | Use |
|---|---|---|
| Minimum voltage | 0.95 pu | Lower allowed voltage relative to nominal voltage. |
| Maximum voltage | 1.05 pu | Upper allowed voltage. It must exceed the minimum voltage. |
| Maximum thermal loading | 100% | Maximum loading relative to an equipment rating. |
| Minimum connection headroom | 0 kW | Minimum remaining connection capacity required. |
| Reverse power flow | Allowed | Select Not allowed when reverse flow is prohibited. |
Set the case assumptions using limits that apply to your connection and equipment. Voltage, thermal loading, and flow conclusions depend on the available network model and source data.
Capture the Engineering snapshot
- Select Capture current map scope.
- Check Snapshot, Confidence, and Captured.
- Read any diagnostics below the snapshot.
- Resolve missing inputs before relying on network conclusions.
The snapshot records the electrical input and a content digest. required means no snapshot is captured. captured means the case has a snapshot reference. It does not mean every electrical input is complete.
Changes to case inputs or the captured snapshot mark completed results as stale results. After changing the map inputs, capture the intended scope again and re-run before using the results.
Scope example
Save and reopen cases
- Make the required input changes.
- Select Save case revision in the header.
- Check the revision indicator beside Rev.
- Select Case history to open Cases & revisions.
- Select an item under Engineering cases to open that case.
- Select an item under Current case revisions to load an earlier saved specification.
The save button is disabled when there are no unsaved changes or a save is in progress. A first save creates the case. Later saves create immutable revisions. A run also saves a revision before execution. Editing an earlier revision and saving creates another revision; it does not replace the historical one.
The history shows the case mode and update time. Revision entries show their number, message, and creation time. Close the drawer with Close case history, the backdrop, or Escape. If history is empty, save a case in the current context first.
Duplicate and share
The workbench has no separate case-duplication or public case-sharing control. Use option sweeps for design alternatives and revisions for saved input changes. Renaming a saved case does not create an independent copy.
Use Workspace Collaboration and Sharing for access to a shared project. Use Comparison and Reports to share exported findings. A downloaded report does not grant access to the saved case.
Saved example cases
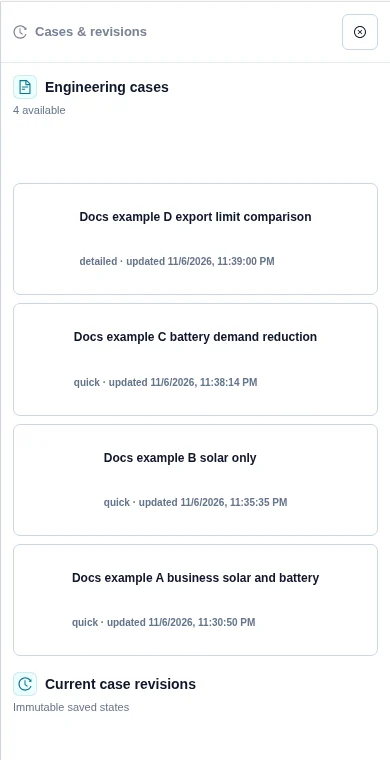
See Worked Examples for the inputs, run states, and displayed results.
Legacy estimates
Select Legacy estimates to open the older annual scenario calculator. It has separate local records and a backend scenario library. Use Upgrade to Engineering Case to create a versioned case, then complete its scope and validation.
See Legacy Estimates for its presets, interval CSV, saved scenarios, and upgrade procedure.
Reusable inputs and review tools
Use the Shared Library for versioned inputs. Dispatch Calendars and Sizing covers operating bounds and discrete size comparisons. Asset Screening explains standalone checks and explicit battery performance bindings. The Shared Library guide shows how to apply pinned assets and operating-window load profiles to a case.
For commercial review, see Contract Settlement and Participant Allocation. Create immutable-run exports with Saved Reports and Templates. The Docs Assistant finds cited guide excerpts; it does not assess your case.
Related Guides
- Profiles and Inputs
- DER Design
- Options and Results
- Value and Finance
- Tariffs
- Comparison and Reports
- Legacy Estimates
- Grid Circuit Builder
- Workspace Collaboration and Sharing
- Worked Examples


