

Docs Menu
Power Planning
Build an electricity-planning case, check it, run a planning study, and export a PLEXOS 12 import package.
Open Power Planning
- Open the Rosetta products menu above the map.
- Choose Engineering Studies.
- In the left menu, under Studies & Planning, choose Power Planning.
The header shows the text Native chronological dispatch, unit commitment, expansion, adequacy, stochastic, hydro, and one-way PLEXOS export. The badge on the right shows the number of blockers, or locally ready when the local check finds no blocking issue.

Who Can Use Power Planning
Power Planning is included with Professional and Enterprise plans. On Plans & Billing, these are the Pro and Enterprise plans.
On a lower plan, Engineering Studies shows a lock and Upgrade in the Rosetta products menu. If the Power Planning tab opens on a lower plan, it shows this message instead of the workbench: Power Planning is included with Professional and Enterprise plans. Your current plan does not include it. To get access, change your plan in My Account or contact Network Map support. To change your plan, see Accounts, Plans and Billing.
You can open, edit and run cases only in projects that you can access. To save or run a case in a shared project, you need editor access to that project.
Daily limits
Each user has these limits in any rolling 24-hour period, across all projects:
| Item | Limit per user in 24 hours |
|---|---|
| Planning runs | 24 |
| New planning cases (new and duplicated) | 100 |
| Saved revisions | 500 |
| Saved profiles | 200 |
| PLEXOS 12 exports | 50 |
You can have up to 2 runs in the queue at the same time. Runs from all users share one queue of up to 10 runs, so a run can wait before it starts. When a queue is full, the workbench shows Planning queue limit reached (2 queued runs per user) or Planning queue is full (10 queued runs globally).
When you reach a limit, the workbench shows a message such as Planning run limit reached (24 per user in 24 hours). Try again later or contact support to raise the limit. To ask for a higher limit, email support@networkmap.energy.
Choose an Editor Mode
| Mode | Use |
|---|---|
| Guided | The initial mode. Shows the main fields for each stage. |
| Expert grids | Adds columns such as build limits, CAPEX, unit commitment and ramp limits, and adds the Reserve products and Global constraints grids. |
| Advanced JSON | Edits the complete draft as JSON. Schema and readiness validation still apply. |
Work Through the Stages
The workbench has eleven stages. Select a stage directly. The number on each stage changes colour to show its status.
| Stage | What you do |
|---|---|
| 1 Case | Project, ownership, and study intent. |
| 2 Data | Map snapshot, profiles, and provenance. |
| 3 Chronology | Study horizon and temporal detail. |
| 4 Resources | Demand, generation, and storage. |
| 5 Network | Buses, branches, and transformers. |
| 6 Constraints | Reliability, reserves, policy, and economics. |
| 7 Scenarios | Uncertainty and scenario probabilities. |
| 8 Readiness | Strict validation before compute. |
| 9 Run | Immutable revision and solver execution. |
| 10 Results | Planning metrics and result datasets. |
| 11 Export | Portable PLEXOS 12 import package. |
Set Up the Case
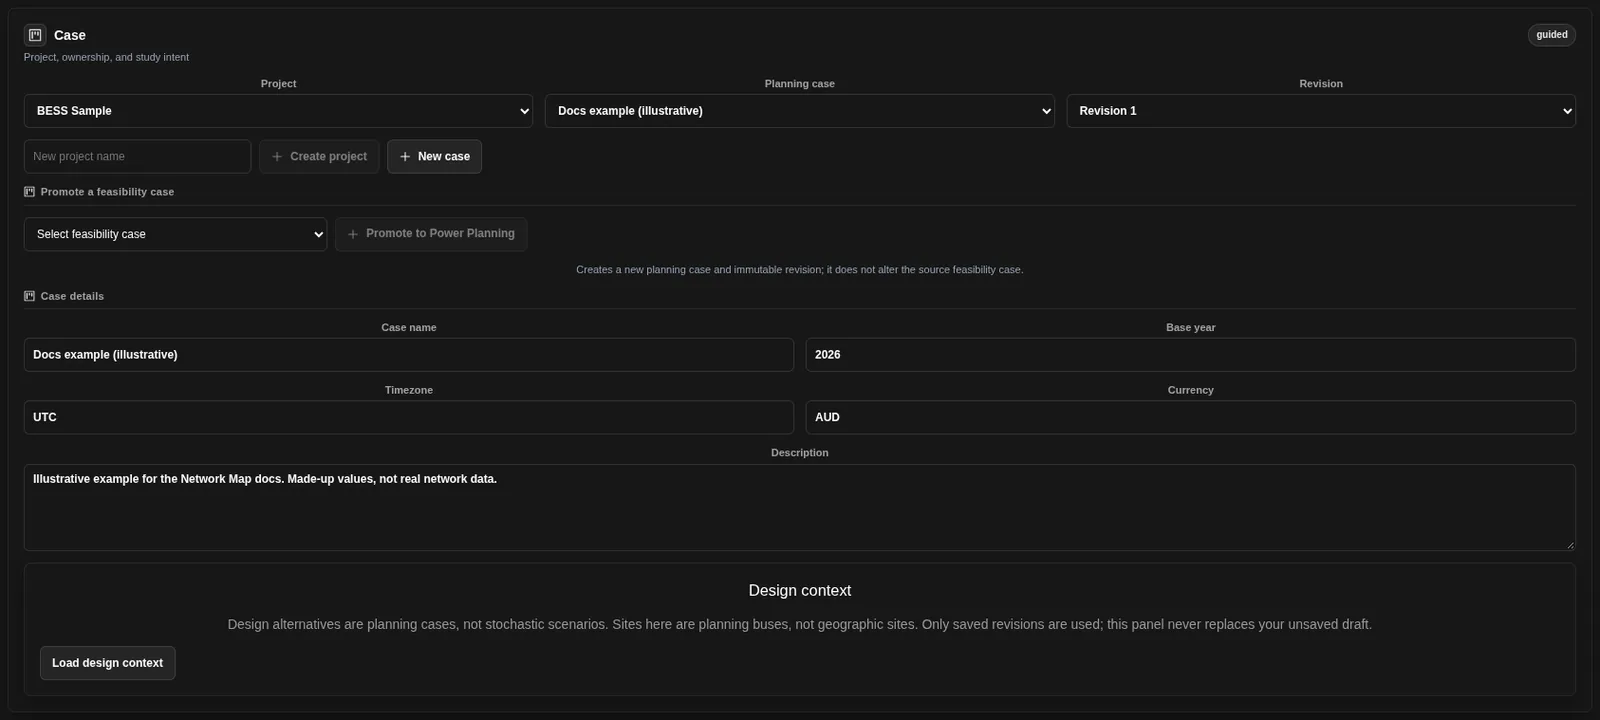
The screenshots show Docs example (illustrative), a tutorial case with assumed inputs.
- Select a Project, or type a New project name and choose Create project.
- Select a Planning case, or choose New case.
- Select a saved Revision, or keep Unsaved to work on a draft.
- Enter the Case name, Base year, Timezone, Currency and Description.
To start from a saved Project Scenario Modelling case, use Promote a feasibility case. The list shows the saved Project Scenario Modelling cases in the selected project. It does not list System Feasibility cases. Select the case and choose Promote to Power Planning. This creates a new planning case and an immutable revision. It does not change the source case. Review the inferred electrical and time assumptions before you run.
Design context shows the design alternatives in the selected project. Design alternatives are planning cases, not stochastic scenarios. Only saved revisions are used. Choose Load design context to show it.
Add Data and Profiles
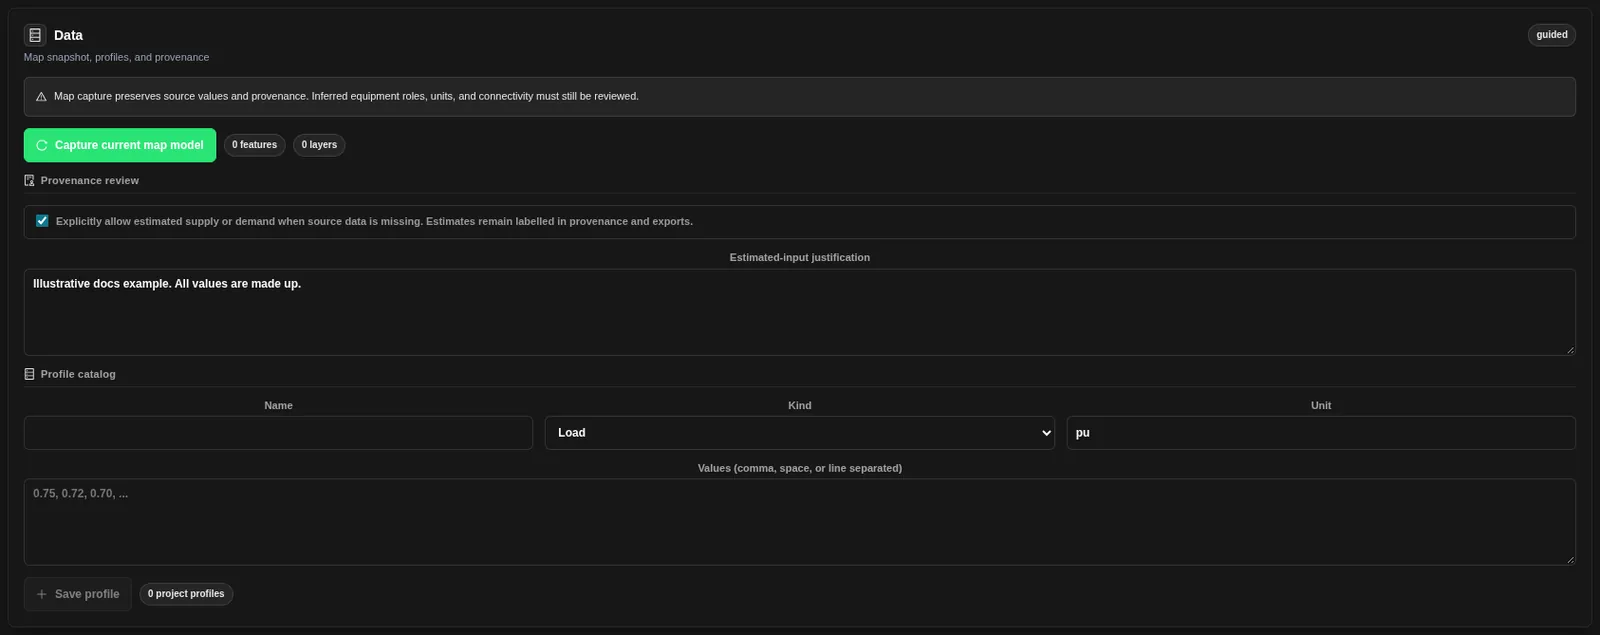
- Capture current map model copies the mapped features into the draft. The capture keeps source values and provenance. Review the inferred equipment roles, units and connectivity before you use them.
- Under Provenance review, you can allow estimated supply or demand when source data is missing. Enter an Estimated-input justification. Estimates stay labelled in the provenance and in exports.
- Under Profile catalog, enter a Name, a Kind (Load, Generation, Availability, Price or Hydro inflow), a Unit and the Values, then choose Save profile.
Set the Time Basis and Resources
In Chronology, choose Full chronological or Representative days. Set Start, Resolution (minutes) (5, 10, 15, 30 or 60) and Time steps. A study can have up to 8,784 time steps. With representative days, you can force a peak-demand day and a minimum-renewables day into the set.
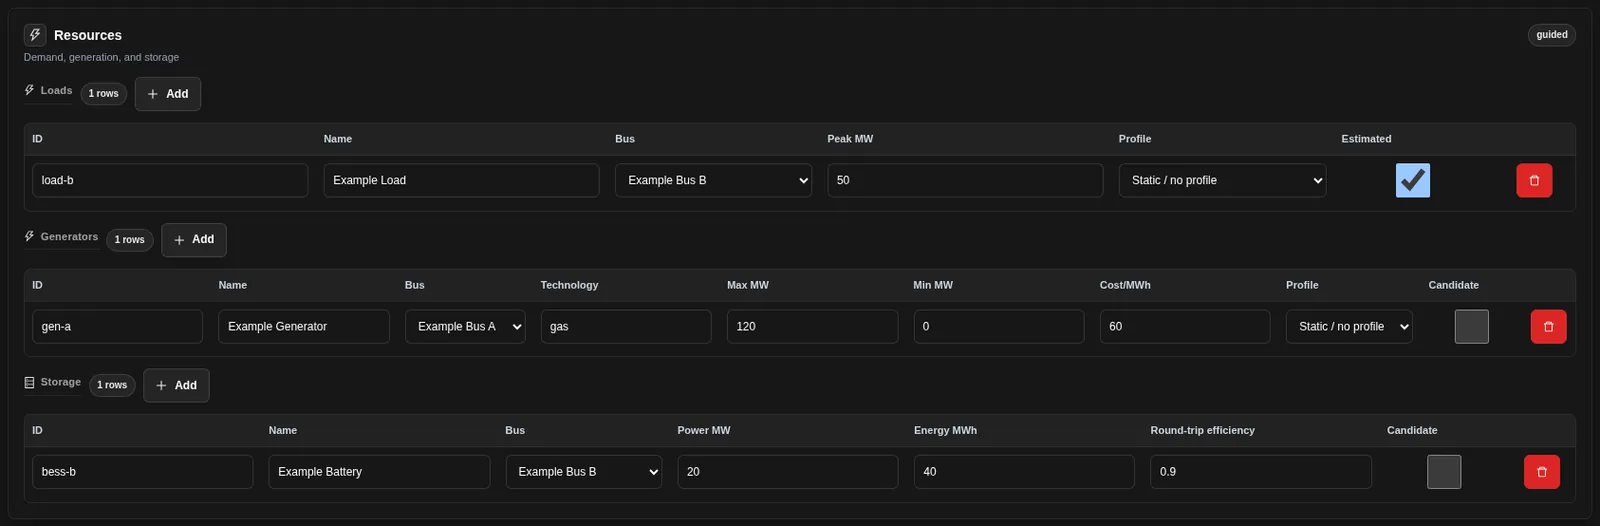
In Resources, add rows to the Loads, Generators and Storage grids. Link each row to a bus and, where needed, a profile. Mark a load as Estimated when it is not from source data.
Describe the Network
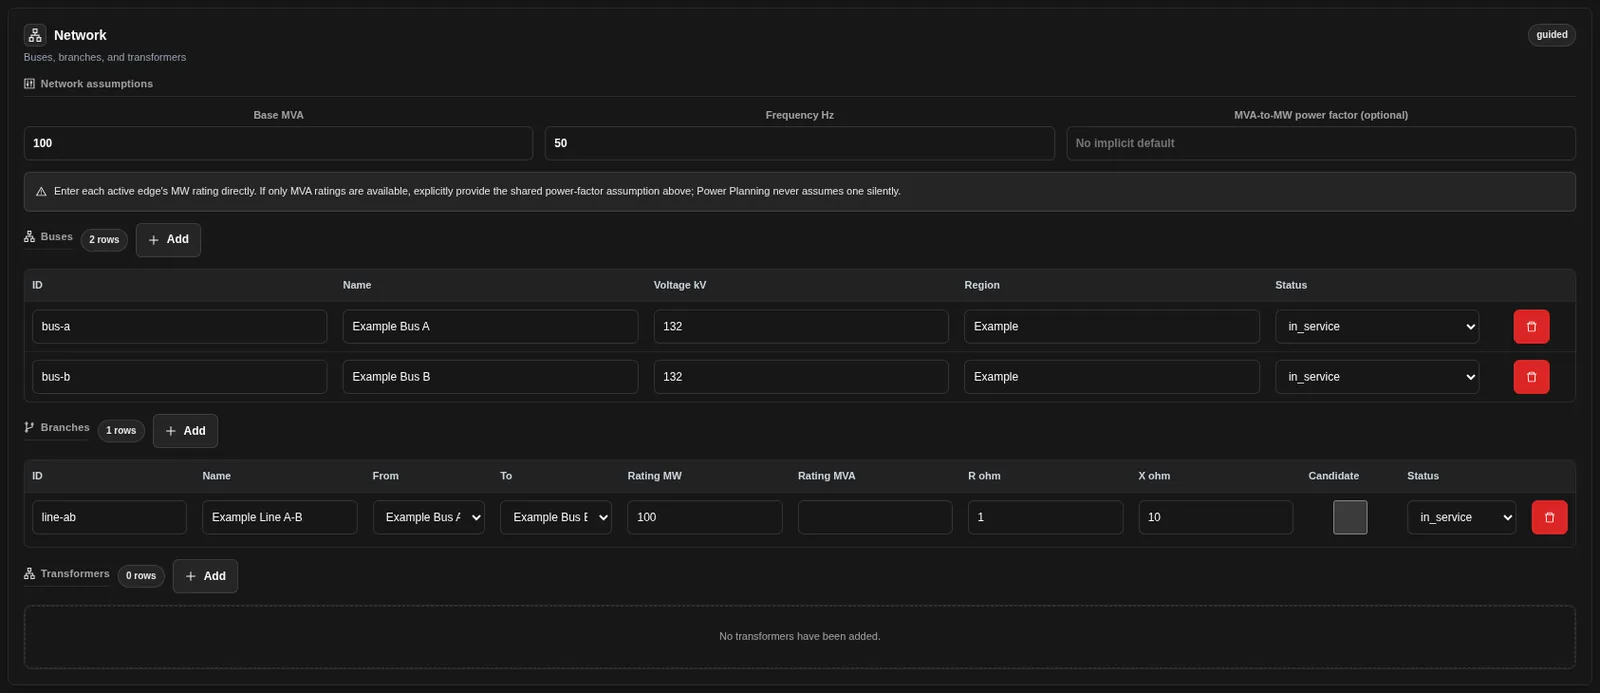
Set Base MVA and Frequency Hz. Then add Buses, Branches and Transformers.
Enter the MW rating of each active branch and transformer. If you only have MVA ratings, enter one shared MVA-to-MW power factor (optional). Power Planning never assumes a power factor for you.
Set Constraints and Scenarios
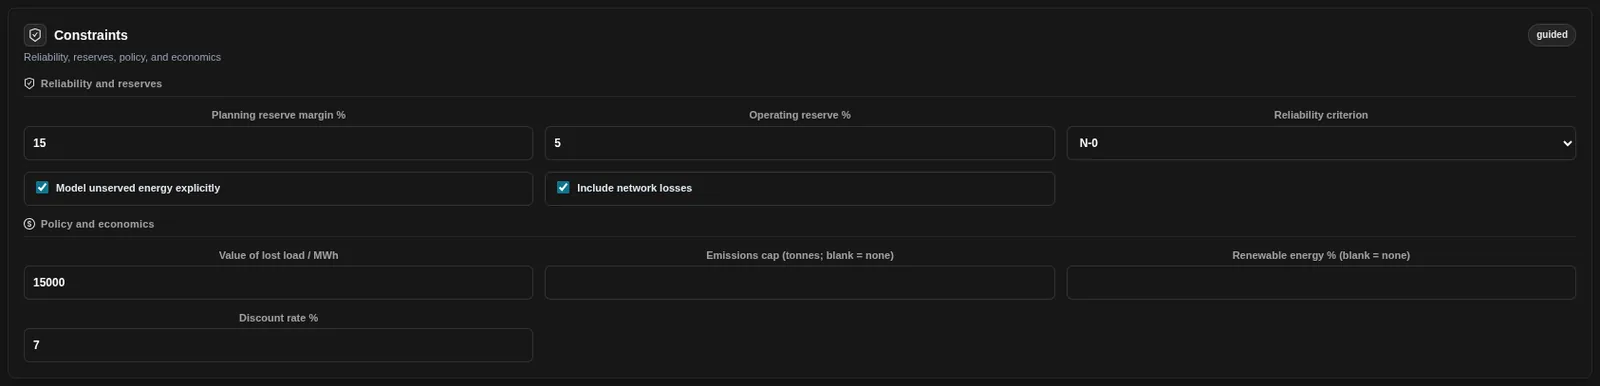
- Reliability and reserves: Planning reserve margin %, Operating reserve %, Reliability criterion (N-0 or N-1), Model unserved energy explicitly and Include network losses.
- Policy and economics: Value of lost load / MWh, Emissions cap, Renewable energy % and Discount rate %. Leave the emissions cap or renewable energy target blank for none.
- In Scenarios, give each scenario a Probability and multipliers for load, renewables and fuel cost.
The initial values are assumptions. Replace them with values that apply to your study.
Check Readiness
- Open Readiness. The local check lists each blocking issue and warning.
- Select an issue to open the stage that needs a change.
- When the draft is locally ready, choose Save & validate. This saves the draft and validates it on the server.
Blocking issues stop a run. Warnings do not. A new, empty draft has three blocking issues: buses_required, load_required and supply_required. Add at least one bus, one load and one generator or storage unit.
After Save & validate, a badge shows the server result, for example server ready.
Power Planning does not make up demand, supply, ratings or costs. It uses estimated inputs only when you allow them on the Data stage. A load without a profile then gives the warning load_profile_missing.

Run a Planning Study
| Study type | Extra inputs |
|---|---|
| Chronological dispatch | None. |
| Unit commitment | Rolling horizon hours and overlap hours. |
| Capacity expansion | Investment periods with year, weight and discount factor. |
| Resource adequacy (PASA-style) | Monte Carlo trials (max 1,000) and a random seed. |
| Two-stage stochastic planning | At least two probability-weighted scenarios on the Scenarios stage. |
| Hydro scheduling | Hydro reservoirs with volumes and upstream links. |
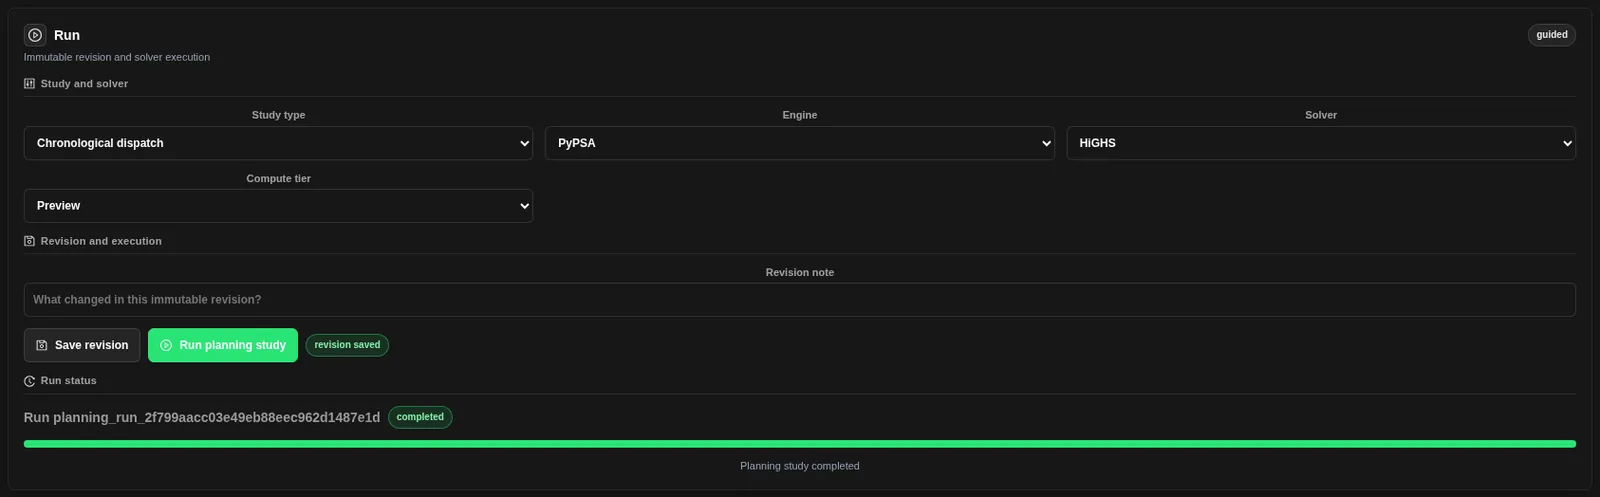
- Open Run.
- Choose the Study type. The Engine is PyPSA and the Solver is HiGHS.
- Choose a Compute tier: Preview, Balanced or Comprehensive.
- Enter a Revision note and choose Save revision. Each save creates an immutable revision. You cannot change a saved revision.
- Choose Run planning study. If the draft has unsaved changes, this saves a new revision first. The server validates the revision before the run starts. Use Cancel to stop an active run.
- Read the run status under Run status: queued, running, completed, failed or cancelled, with a progress bar.
A run can take up to one hour before it times out. Use the Preview tier and a short horizon for a first check.
Read the Results
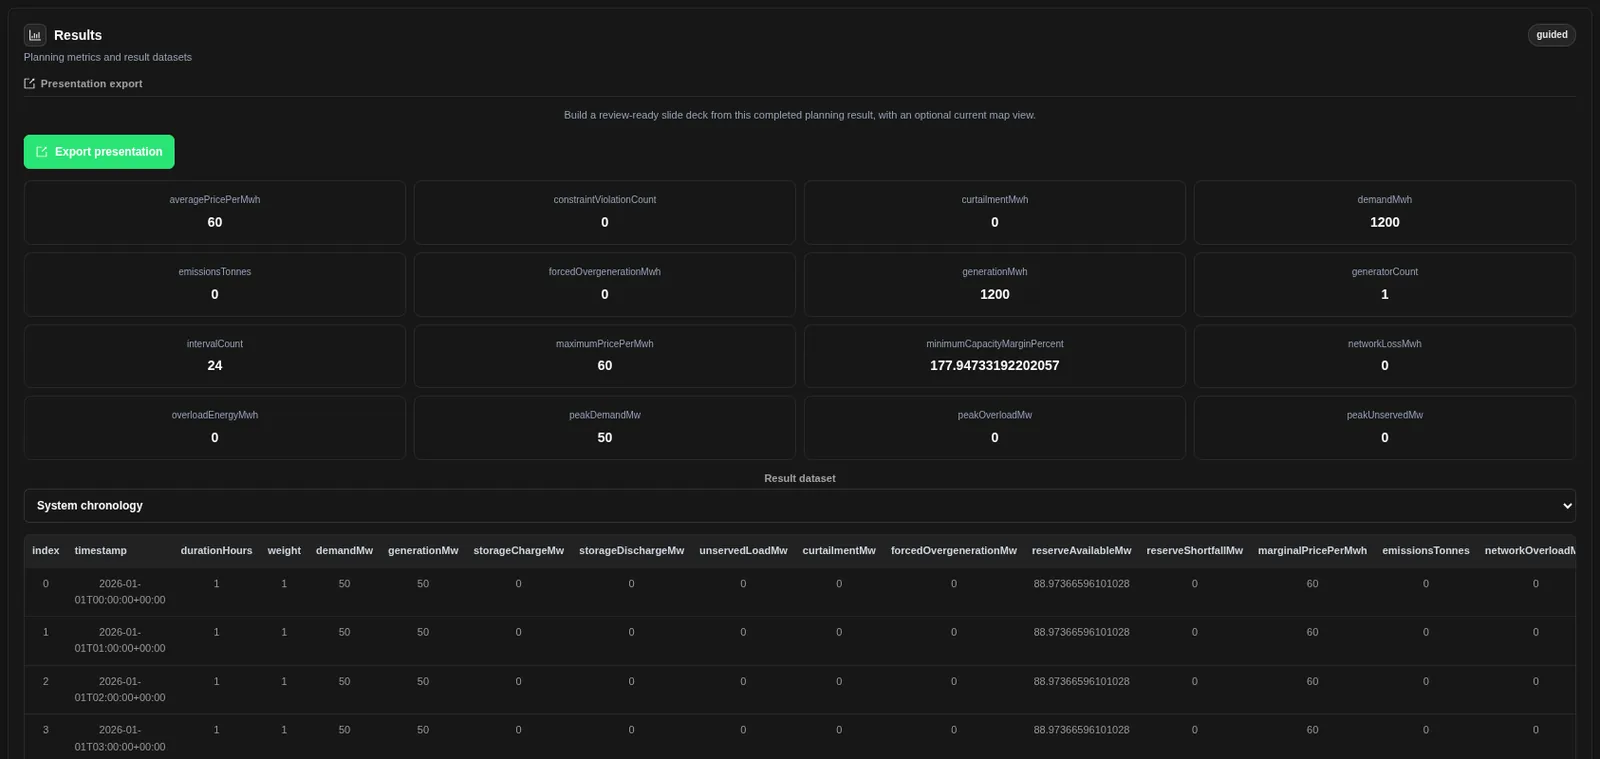
Results shows the summary metrics of the completed run and its result datasets. Choose a Result dataset to page through its rows. With no completed run, the stage shows Run a planning revision to produce results.
The metrics include, for example, demandMwh, generationMwh, averagePricePerMwh, peakDemandMw, peakUnservedMw, curtailmentMwh, networkLossMwh and emissionsTonnes. The datasets include System chronology, Generator dispatch, Storage dispatch, Network flows, Generator summary, Storage summary and Constraint results.
Choose Export presentation to build a slide deck from a completed result. The button is available only for a completed, current result.
Export a PLEXOS 12 Package
- Open Export.
- Choose Build PLEXOS 12 package. The package is built from the saved revision. If the draft has unsaved changes, a new revision is saved first.
- When the build is complete, Download ZIP and the compatibility_candidate badge show. Choose Download ZIP.
The ZIP contains an Excel import workbook, relative CSV time series, a manifest, a mapping, a validation report and a readme. The tiles show Target PLEXOS 12, Package ZIP + XLSX + CSV, Direction Export only and Results included No.

Related Guides
- Engineering Studies
- System Feasibility and Planning Studies
- Connection Study and System Feasibility
- Engineering Exports and Handoffs


